Revision History
This article applies to all modalities except radiation oncology.
After you finish and submit your application, ACR staff will ensure that everything is received (fees, survey agreement if applicable, etc.) and accept your application. You will then receive an email stating that your online testing package is available.
Facilities seeking ACR accreditation will upload required images for accreditation to an encrypted, secure server for accreditation review. In addition to decreasing the turnaround time for receiving an accreditation final report, uploading images mitigates the risk of losing images during transit.
Please refer to the testing instructions specific to your modality to ensure you are uploading only the images that are required for your testing package. It is important when uploading images to ensure that all images have been successfully uploaded and viewed prior to submission.
Submitting Materials for Accreditation: General Information
Once the testing package is available, you may access it by clicking on “My Testing Packages.” To open your testing package, you will click the “Modify” link under the Action column. You will see several options on the left-hand navigation pane. Each section must be completed prior to testing package submission. This article provides an overview of the "Upload Images" process.

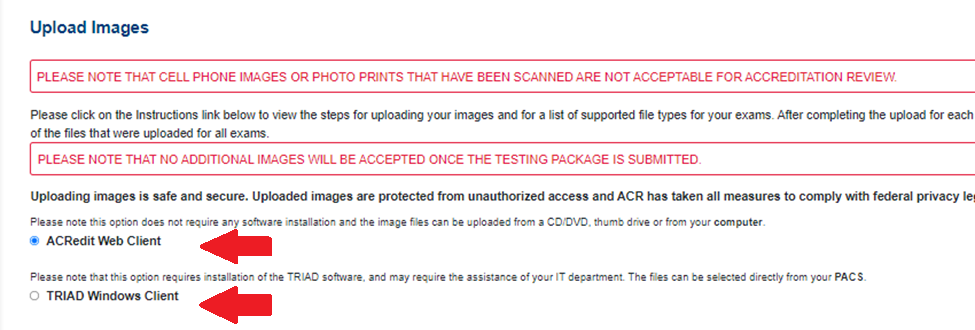
Image Upload Options
On the ‘Upload Images’ screen, there are two choices for uploading your images. The ACRedit Web Client is recommended when uploading images that are saved on the computer, disk or thumb drive. TRIAD Windows Client must be used if uploading images directly from your PACS. The specifics for each of these options are outlined in the table below.
ACRedit Web Client
| TRIAD Windows Client
|
You can switch between these two uploading methods at any time as long as the correct radio button is selected (see image below). Keep in mind when switching between programs you will need to refresh the page to reflect the correct file count. You will be able to add or delete images until your online testing package is submitted. Once your testing package is fully submitted, you cannot make any changes to the images you have submitted.
Changing Your Exams for Submission: Exam change requests must be submitted as support ticket requests. There, you may select the topic/category of exam change, fill out the modality ID number and unit (if applicable) and specify the exam or module you wish to add, remove or change.
Preparing Images for Accreditation Submission
DICOM images are required for most accreditation submissions; however, some modalities may allow images to be uploaded as jpeg, gif, tiff, or bmp files. There are several ways you can save your DICOM images to prepare for image upload, including:
Export the images from your PACS and save them to your computer
Export the images from your PACS and save them onto a CD/DVD or a thumb drive
Export the images from the unit in which they were acquired and save them onto a CD/DVD or thumb drive
Only post processed images should be uploaded and submitted
Upload only required images/sequences for accreditation (refer to testing instructions for the relevant modality)
Once the images are uploaded, you must click the "View Images" link. Ensure all required images are uploaded and and that they are all viewable in the NilRead DICOM viewer
Do not include physician reports in the image upload
Do not upload anonymized images for accreditation
Do not upload compressed DICOM images for accreditation
While uploading your images, if you get an error message noting an unsupported file type, review the acceptable file types for the modality/exam under the "Instructions" link on the "Image Upload" page and ensure that only those file types are being uploaded
If your facility has technical limitations that prohibit you from uploading images electronically, please contact ACR staff for assistance. For all accreditation programs (BUAP, CTAP, MAP, MRAP, NMAP, PETAP, SBBAP and UAP), please dial 1-800-770-0145.
DO NOT TAKE CELL PHONE IMAGES and upload as electronic
DO NOT SCAN paper or color photo prints and upload as electronic
Non-digital images (i.e., scanned documents saved as jpg) are not acceptable for clinical or phantom submissions
Previous: | Next: |
| Image Submission with ACRedit Web Client |
|

